Table of Content
- Method one. Change network access type via the Control Panel and Settings app
- Change network location in Windows 8.1
- How to change Windows 8.1 network location from Public to Private
- Download Smashing Magazine Desktop Wallpaper August 2021 Windows 10 Theme
- Windows 8.1
- Change from Public to Private Network in Windows 7, 8 and 10
- Microsoft Announces Windows 365
- Enable the Hyper-V feature
Designating the network as public or untrusted ensures other devices on the network cannot access your PC. When using a public Wi-Fi hotspot, we recommend keeping your connection public. You must be logged in as an administrator to change your network from public to private or vice-versa.
You can change the network profile in WIndows 8 and Windows 8.1 using a Registry tweak. After you follow the steps described below, you can easily switch your network location type from Public to Private and vice versa. Now all you have to do is turn on the Find devices and content option.
Method one. Change network access type via the Control Panel and Settings app
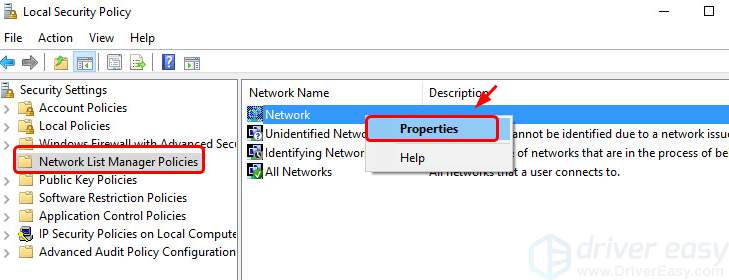
Changing any of the settings in each of location profile is not recommended, unless you know what you are doing. As a last resort, if you can’t change the network location using the methods above, you can manually change the network location using a tool called secpol.msc. This will not work on the Home, Student or Starter editions of Windows. In Windows, press the Windows Key + R, which will bring up the Run dialog box.

Here you will see the network you are connected to and what type of network Windows 8 has identified it as. First, right-click on the network icon in the Windows 8 system tray and click on Open Network and Sharing Center. Now click on Network and you’ll see the list of connections, i.e Ethernet, Wireless, etc. When you connect to a network through an Ethernet cable, the process is slightly different. You can also use this alternative method when connected via Wi-Fi.
Change network location in Windows 8.1
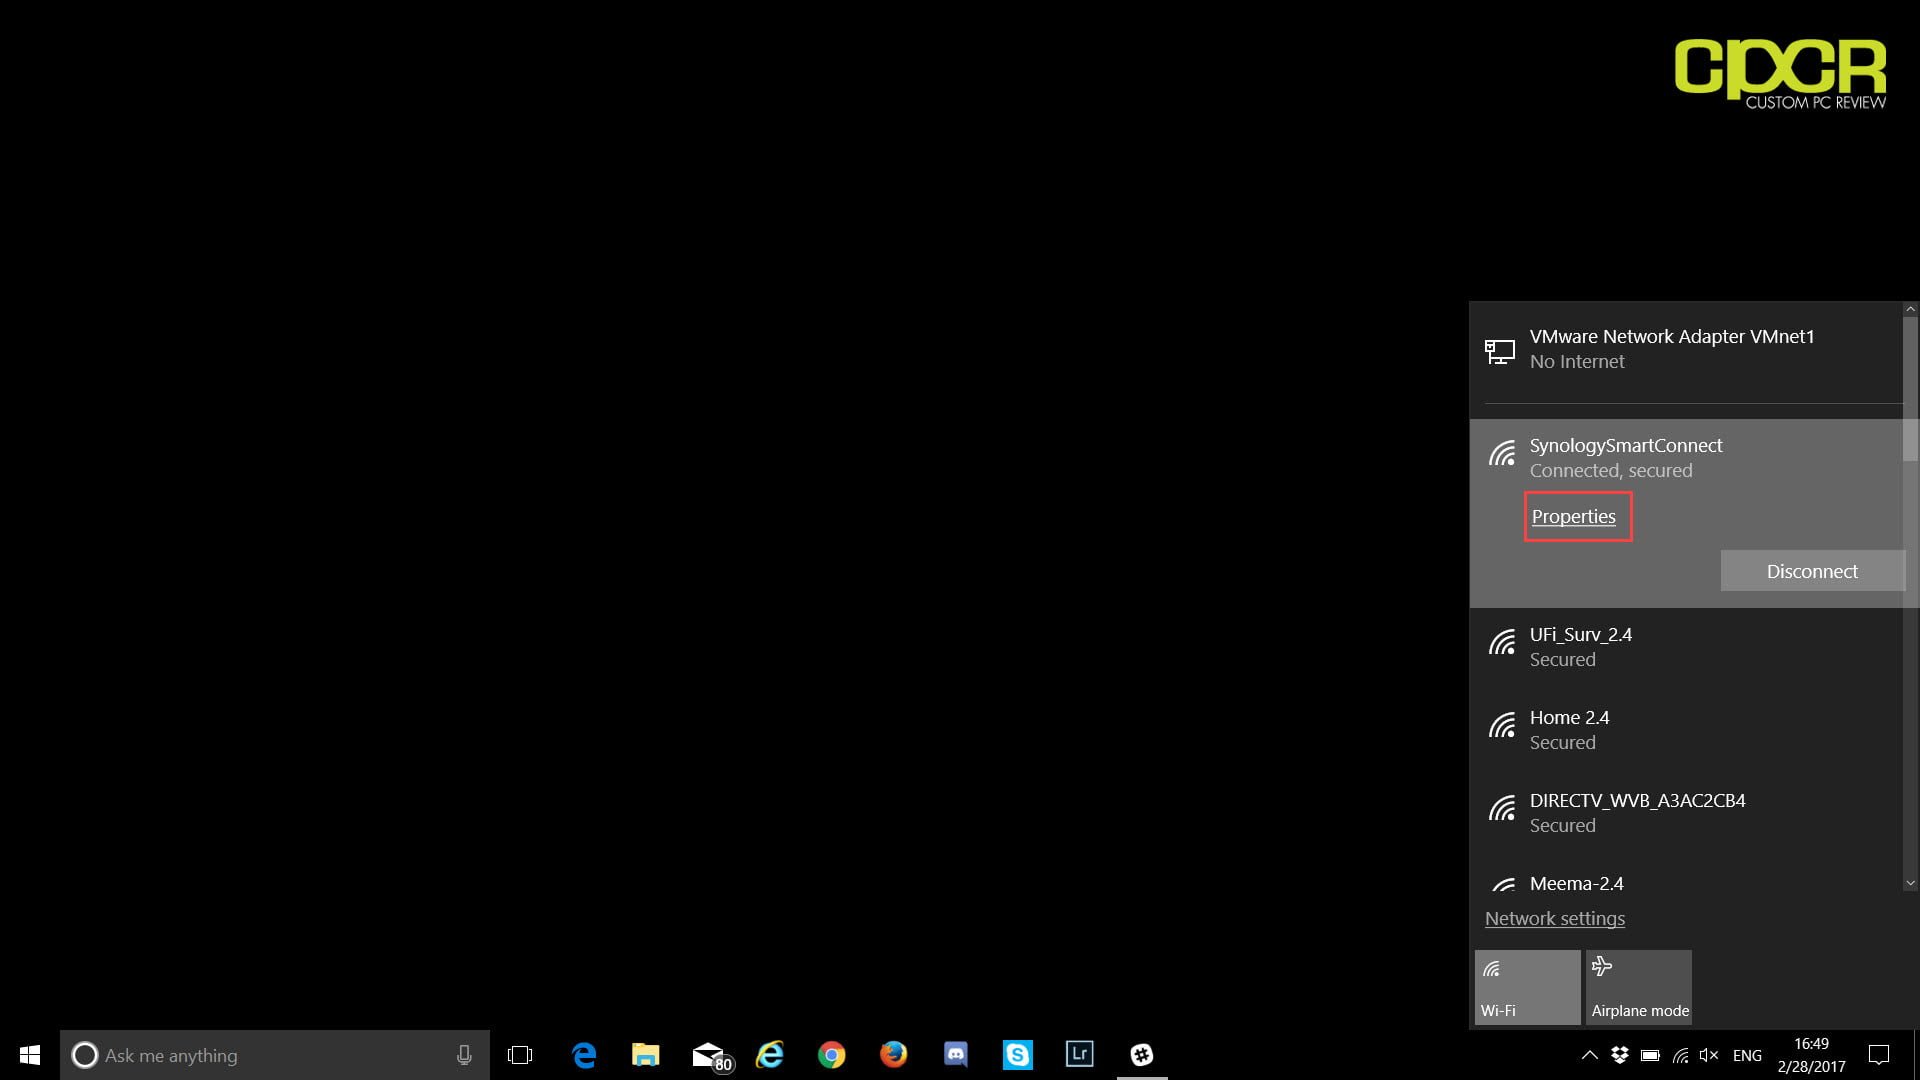
If you are connected to a WiFi network, it will be the name of your WiFi network. For WiFi networks, you’ll also have the option to connect automatically when in range of the WiFi network. If you don't see the icon, select the up-arrow to expand the options. Needs to review the security of your connection before proceeding. Go to the GUID subkey which matches your current network connection. Emphasis is on home test labs, not production environments.
Right-click the network icon in the system tray and select Open Network and Sharing Center. To do this, open the Network and Sharing Center by right-clicking on the "Network" icon present in the taskbar. Then, if you want to close the "PC Settings" application present in the background, move your mouse to the upper left corner to display a small square. However, the procedure is the same whether it's a wired or wireless (Wi-Fi) network. Click the name of the network you are connected to. As during the installation of Windows 8, you also have the possibility to choose between "Private network" and "Public network" during the installation of Windows 8.1.
How to change Windows 8.1 network location from Public to Private
HomeGroup is not available on public networks, and network discovery is turned off. Sometimes Windows detects a private network as a public one and vice versa. You can manually make some changes to ensure that you are not accidentally sharing either too much on a public network or blocking all sharing on a private network. You can use Get-NetConnectionProfile cmdlet to find out the active network and pipe through to Set-NetConnectionProfile to change the current network profile. For example, the following command changes the current active network profile to Public.

There is also an option in Windows 7 to treat all future networks as public networks automatically, though I don’t think most people would find that useful. Here, you will see an overview of your network connection. Under View your active networks, you’ll see the name of the Ethernet or WiFi network and it should have a link underneath called Home network, Work network or Public network. In Windows, when you connect to a wireless network, it will either register it as a Public network or a Private network. Private networks are basically home and work whereas public networks are anywhere else, which you don’t trust.
Download Smashing Magazine Desktop Wallpaper August 2021 Windows 10 Theme
To change it, right-click the network icon in system tray and choose Open Network and Sharing Center. Then in Network detail page, slide the switch inFind devices and contentsection Off to stay asPublic and On asPrivate. It’s controlled by network admin and can’t be selected and changed. It may also be called something else, but it doesn’t have a description.
I have never had a windows system run for years without needing a reboot because of memory leak, but that is what I have had with DOS, and linux . The other thing that annoys me is secure boot, and the only way to get rid of it is to basically reinstall the OS. My problem is just like in the article you linked to.
On home router, No option for “find devices or content”. And my network is marked as “unidentified network”, so I don’t know which network to edit . So frustrating when all I want to do is share a file. There are two ways to change the network type in Windows 8.1 and Windows 8. Then just turn off or on the sharing option switch at the top of the page which should change from Public to Private network "second picture". This seems to be a completely different procedure compared to Windows 8.
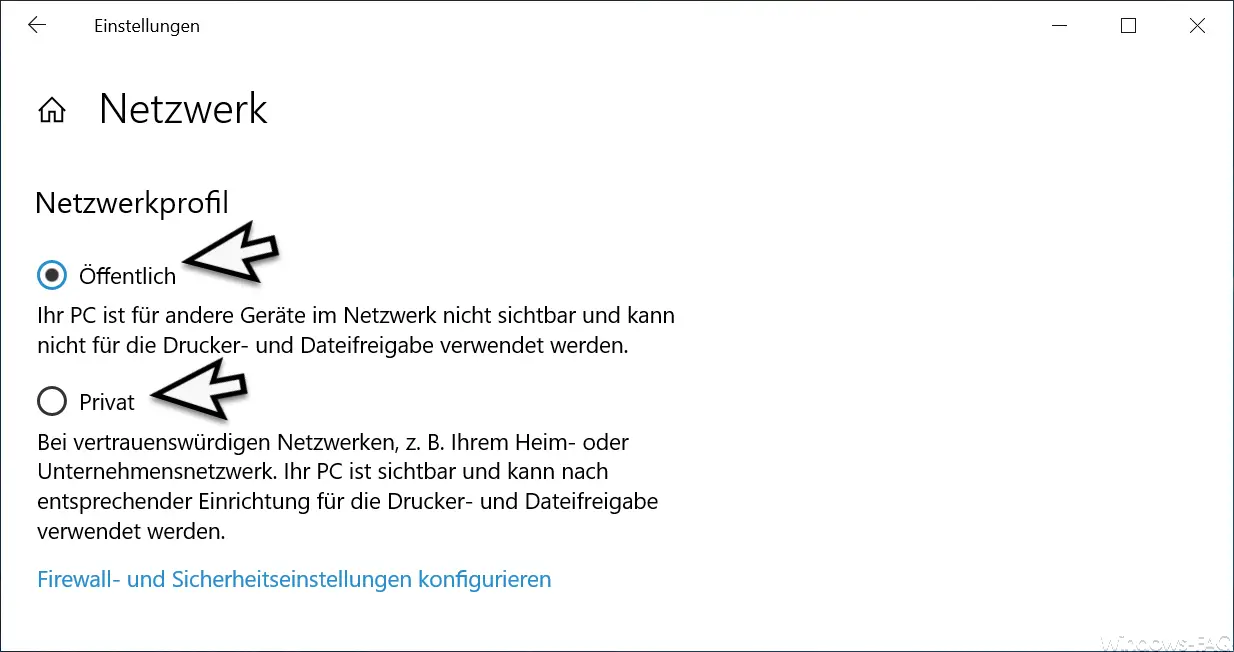
This article explains how to change a network from public to private on Windows 10. Designating a connection as private makes it discoverable to other devices, so only do this for networks you trust. The default settings in each of the network profile are the best practice in each of the scenario.
Windows 8.1 is the worst, it is easier to network with DOS.
As you can see above, my network is considered a Private network, which is correct since I’m at home and connected via Ethernet. If this is incorrect, there are a couple of things you can do. First, you can click on Change advanced sharing settings in the left-hand pane.
Microsoft Announces Windows 365
This setting works fine for me so I'm not sure why this setting can't be changed through the charms bar. If you are connected to the network via a network cable, it will appear in the "Ethernet" section. When you connect to a new network on Windows 8.1, Windows will ask you if you want to find PCs, devices, and content on that network. On Windows 8.1, you again have the option to choose between "Private network" and "Public network" as was the case with Windows 8.
Total or partial reproduction of this site is prohibited and constitutes an infringement punishable by articles L.335-2 and following of the intellectual property Code. After installing Windows 8.1, several configuration steps will appear, including the "Settings" step. Once you have done this, you then need to go to the Windows 8 desktop and open the Charms bar. Click on Settings and then click on the Network icon. Go ahead and click on the name of the WiFi network or Ethernet network that has the Connected status.

No comments:
Post a Comment